SSH Specify Port Login Tutorial: Connect to a Server on a Custom Port
In daily server administration, SSH specify port login is one of the most common operations. For security reasons, many servers move SSH from the default port 22 to a custom port, and logging in the default way then fails with a connection refused or timed out error.
This guide follows the actual order of operations and covers three steps: specifying the port on the command line, changing the default port, and opening the new port and verifying the login.
How to Specify the Port on the Command Line
Windows 10 and later, macOS and Linux all ship with the OpenSSH client, so you can simply open a terminal. For an SSH remote connection to server on a custom port, just add the -p option followed by the port number, in this format:
ssh -p PORT root@SERVER_IP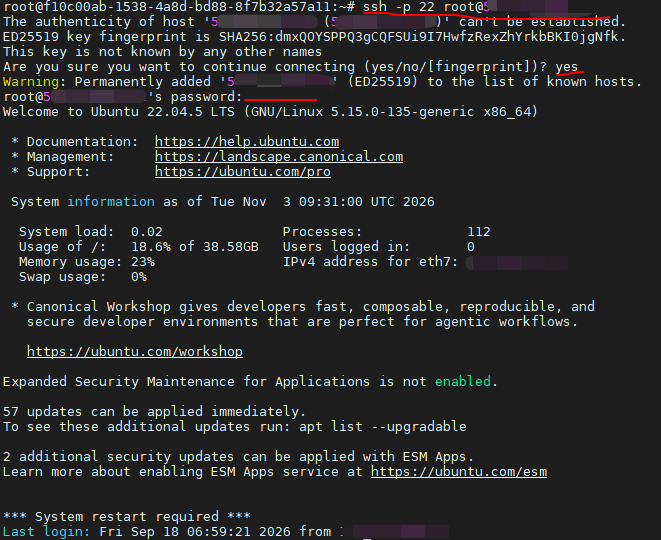
Here, PORT is the port the server actually listens on, and root is the login user. On first login you are asked to confirm the host fingerprint; type yes, then enter the password. Note that -p must be lowercase.
If you use key-based login, add the -i option to specify the private key file:
ssh -i ~/.ssh/id_rsa -p 2222 root@SERVER_IPWhen transferring files, scp and sftp use an uppercase -P to specify the port, the opposite of the ssh command, so it is easy to get wrong:
scp -P 2222 ./file.zip root@SERVER_IP:/root/Change the Default SSH Port
Port 22 is the publicly known default, and servers are constantly scanned and brute-forced by scripts soon after going online. Changing the port only affects the entry point of an SSH connection; it is no substitute for strong passwords or key authentication, but it reduces the chance of being hit by bulk scans. The steps below use port 2222 as an example; choose an unused number between 1024 and 65535.
Step 1: edit the sshd configuration file on the server:
vi /etc/ssh/sshd_configFind the line #Port 22, press i to enter insert mode, remove the leading #, and add a new line Port 2222 (an example port, use your own). Do not delete 22 until the new port is confirmed to work; keep both ports active so that a configuration mistake does not lock you out.
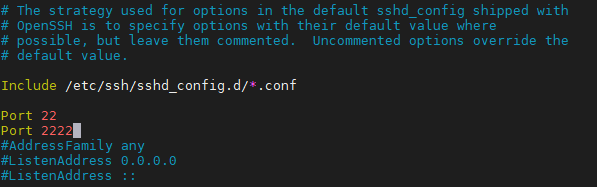
Press Esc to exit insert mode, then type :wq and press Enter to save and quit the editor. Then restart the service. The service is named sshd on CentOS and Rocky, and ssh on Ubuntu and Debian:
systemctl restart sshdNewer Ubuntu releases (such as 24.04) let ssh.socket handle listening by default. If the new port does not take effect, also run systemctl daemon-reload and systemctl restart ssh.socket. Then check that the port is being listened on:
ss -tlnp | grep sshd
Open the New Port and Verify the Login
After the service is listening on the new port, the firewall must allow the traffic. VMRack VPS supports mainstream systems such as CentOS, Rocky, Ubuntu and Debian, and each uses a different firewall tool. Ubuntu and Debian commonly use ufw:
ufw allow 2222/tcpCentOS and Rocky commonly use firewalld:
firewall-cmd --permanent --add-port=2222/tcp
firewall-cmd --reload
If your provider also offers a network-level firewall or security group, open TCP 2222 there too, otherwise the port remains unreachable from outside. Once that is done, keep the current window open and test the new port from a second terminal:
ssh -p 2222 root@SERVER_IPAfter a successful login, go back to sshd_config and delete the Port 22 line or comment it out with #, then restart the service and remove the firewall rule for port 22, which closes the old port completely. If the test fails, your original session can still be used to review the configuration.
Summary
Mastering SSH specify port login is not complicated: use the -p option on the client; on the server, edit sshd_config and open the firewall, then test the new port before closing port 22 to complete the change safely.


- Products
- VPS Hosting
- VPS HostingUnmetered
- Bare Metal
- GPU Rental
- CDNPublic Beta
- Custom CDN
- Object StoragePublic Beta
- TranscoderPublic Beta